MCP Server
| Feature Name | Model Context Protocol (MCP) Server |
| Feature ID | CrestApps.OrchardCore.AI.Mcp.Server |
Exposes Orchard Core AI tools through the MCP protocol, enabling external MCP-compatible clients to connect and invoke AI capabilities.
Overview
The MCP Server Feature allows your Orchard Core application to expose its AI tools and capabilities to external MCP clients. This feature supports the Streamable HTTP transport type, enabling MCP-compatible clients to communicate through the tenant-relative /mcp endpoint.
The Orchard Core server feature builds on the shared AddCoreAIMcpServer() registrations from CrestApps.Core.AI.Mcp, then layers Orchard-specific prompt, resource, admin, and permission services on top.
When OrchardCore.Deployment is enabled, the deployment-plan editor groups the MCP Connection, Prompt, and Resource export steps under the Artificial Intelligence category.
Supported Capabilities
The MCP server exposes the following capabilities:
| Capability | Description |
|---|---|
| Tools | AI tools and configured tool instances that you explicitly opt in are exposed as MCP tools that clients can discover and invoke. Nothing is exposed by default. |
| Prompts | MCP prompts registered in Orchard Core are exposed so clients can list and invoke prompts via ListPrompts and GetPrompt. Prompts can be added and managed via the admin UI. |
| Resources | MCP resources registered in Orchard Core are exposed, allowing clients to access various data sources. Resources can be added and managed via the admin UI. |
| Templated Resources | Resources with URI variable placeholders (e.g., {fileName}, {contentType}) that resolve dynamically based on client requests |
Tool exposure
Tool exposure is opt-in. Nothing is listed or callable by default: the server only exposes the AI tools and configured tool instances that you explicitly allow. The allow-list is enforced by both the list and the call handlers, so a tool that is not exposed can neither be discovered nor invoked.
You configure the exposed tools from the Settings → Artificial Intelligence page, on the MCP Server card. The card has two ways to control exposure:
- Expose all tools — when enabled, every selectable tool and every configured tool instance is exposed and the selection below is ignored. System tools and hidden tools are never exposed, even in this mode. Enabling it hides the Tools and Tool instances selectors, because the selection no longer applies. Use this only when you trust every client of the server.
- Tools and Tool instances selectors — when Expose all tools is disabled (the default), only the tools and tool instances you select are exposed. The selectors list only the tools and instances the current user is allowed to access, exactly like the AI Profile editor.
Both code-registered tools and stored tool instances participate in the same allow-list, so you can, for example, expose a documentation search instance without exposing any content-editing tools.
The settings are stored as site settings, so a change takes effect after the tenant reloads — the settings page shows a reload warning when you save.
Usage case: expose documentation sites to MCP clients
A common reason to run an MCP server is to let an external AI agent answer questions from your documentation. The documentation search sources let you declare a documentation site as a tool instance and scan it on demand, and the MCP server then exposes only the instances you choose.
The following steps expose three documentation sites — core.crestapps.com, orchardcore.crestapps.com, and docs.orchardcore.net — to MCP clients:
- Enable the AI Tool Instances feature (
CrestApps.OrchardCore.AI.ToolInstances). This registers the built-in documentation search sources alongside the HTTP API request source. - Navigate to Artificial Intelligence → Tool Instances and add one instance per site. All three sites are Docusaurus sites that publish a standard
sitemap.xml, so use the Documentation search (sitemap) source for each:- Name
crestapps-core-docs, Description "Search the CrestApps Core documentation.", Base URLhttps://core.crestapps.com. - Name
crestapps-orchardcore-docs, Description "Search the CrestApps OrchardCore documentation.", Base URLhttps://orchardcore.crestapps.com. - Name
orchardcore-docs, Description "Search the Orchard Core framework documentation.", Base URLhttps://docs.orchardcore.net.
- Name
- Enable the MCP Server feature and configure its authentication.
- Navigate to Settings → Artificial Intelligence, open the MCP Server card, leave Expose all tools disabled, and select the three documentation instances under Tool instances. Save.
MCP clients now discover exactly three tools — one per documentation site — and can search each site on demand, while every other tool and instance stays private.
Because the sites are public, no headers, API keys, or credentials are involved. The first search of a site crawls it and caches the corpus, and later searches reuse the cache until the instance settings change.
Authentication and authorization
The MCP server supports these authentication modes:
| Mode | Description | Use case |
|---|---|---|
OpenId | OpenID Connect authentication via the Api scheme | Production environments |
ApiKey | Predefined API key authentication | Simple integrations and testing |
None | No authentication required | Local development only |
When OpenId is used, you can also require the AccessMcpServer permission for an additional authorization check.
Configuration
You can configure the MCP server from the admin Settings → Artificial Intelligence page (on the MCP Server card) without redeploying. The stored site settings are also the source of the tool exposure allow-list.
For deployment scenarios, the same options can be set in appsettings.json, which overrides the stored site settings:
{
  "OrchardCore": {
    "CrestApps": {
      "AI": {
        "McpServer": {
          "AuthenticationType": "OpenId",
          "RequireAccessPermission": true
        }
      }
    }
  }
}
Configuration options
| Option | Type | Default | Description |
|---|---|---|---|
AuthenticationType | string | OpenId | Authentication type: OpenId, ApiKey, or None |
ApiKey | string | null | API key for ApiKey authentication |
RequireAccessPermission | bool | true | Whether to require the AccessMcpServer permission in OpenId mode |
ExposeAllTools | bool | false | When true, every non-hidden tool and tool instance is exposed and the Tools allow-list is ignored |
Tools | string[] | [] | The allow-list of tool and tool instance names exposed when ExposeAllTools is false. Matching is case-insensitive |
Authentication types
OpenId
Uses Orchard Core OpenID authentication through the Api scheme.
{
  "OrchardCore": {
    "CrestApps": {
      "AI": {
        "McpServer": {
          "AuthenticationType": "OpenId",
          "RequireAccessPermission": true
        }
      }
    }
  }
}
ApiKey
Uses a configured API key. Clients can send the key as Bearer your-api-key, ApiKey your-api-key, or the raw key value.
{
  "OrchardCore": {
    "CrestApps": {
      "AI": {
        "McpServer": {
          "AuthenticationType": "ApiKey",
          "ApiKey": "your-secure-api-key-here"
        }
      }
    }
  }
}
None
Use only for local development and testing.
{
  "OrchardCore": {
    "CrestApps": {
      "AI": {
        "McpServer": {
          "AuthenticationType": "None"
        }
      }
    }
  }
}
Getting started
- Enable Model Context Protocol (MCP) Server under Tools -> Features.
- Choose and configure an authentication mode.
- Grant the
AccessMcpServerpermission when you useOpenIdwith access checks enabled. - Opt in the tools and tool instances to expose from Settings → Artificial Intelligence on the MCP Server card. Nothing is exposed until you select it (or enable Expose all tools).
- Connect an MCP client to the server endpoint.
MCP endpoint
The server exposes a single Streamable HTTP endpoint:
| Endpoint | Method | Description |
|---|---|---|
/mcp | POST, GET, DELETE | Streamable HTTP transport for MCP communication |
Example request:
POST /mcp
Authorization: Bearer <access-token-or-api-key>
Example client configuration
OpenId
{
  "mcpServers": {
    "orchard-core": {
      "transport": {
        "type": "http",
        "url": "https://your-orchard-site.com/mcp",
        "headers": {
          "Authorization": "Bearer <access-token>"
        }
      }
    }
  }
}
ApiKey
{
  "mcpServers": {
    "orchard-core": {
      "transport": {
        "type": "http",
        "url": "https://your-orchard-site.com/mcp",
        "headers": {
          "Authorization": "ApiKey <your-api-key>"
        }
      }
    }
  }
}
None
{
  "mcpServers": {
    "orchard-core": {
      "transport": {
        "type": "http",
        "url": "http://localhost:5000/mcp"
      }
    }
  }
}
Prompt Support
MCP Prompts are reusable prompt templates that MCP clients can discover and invoke. They allow you to define pre-configured system or user messages that external AI agents can request on demand — for example, a "summarize" prompt that instructs the model to summarize a given document, or a "translate" prompt that translates text into a target language.
Prompts are listed by clients via ListPrompts and invoked via GetPrompt, which returns the prompt messages for the client to include in its conversation.
Managing Prompts via Admin UI
- Navigate to Artificial Intelligence → MCP Prompts
- Click Add Prompt to create a new prompt
- Fill in the required fields:
- Name: A unique identifier for the prompt (used by MCP clients to reference it)
- Display Text: A human-readable name shown in the admin list
- Description: Optional description that helps clients understand what the prompt does
- Add one or more Messages to the prompt:
- Each message has a Role (e.g.,
system,user) and Content (the message text) - Messages are returned in order when a client calls
GetPrompt
- Each message has a Role (e.g.,
- Save the prompt
Prompts can also be registered programmatically in code or imported via recipes.
Resource Support
MCP Resources represent data that MCP clients can read. A resource has a URI that the client uses to request its content. Resources come in two flavors:
- Static Resources: Have a fixed URI with no variable placeholders (e.g.,
recipe-schema://abc123/recipe). They return the same data every time and appear inListResources. - Templated Resources: Have a URI containing
{variable}placeholders (e.g.,file://abc123/{fileName}). The client fills in the variables when reading the resource. These appear inListResourceTemplatesand allow dynamic content resolution.
Resources can be:
- Created and managed via the admin UI under Artificial Intelligence → MCP Resources
- Registered programmatically in code
- Discovered and accessed by external MCP clients
Managing Resources via Admin UI
- Navigate to Artificial Intelligence → MCP Resources
- Click Add Resource to create a new resource
- Select a Resource Type (e.g., File, Content Item, Recipe Step Schema). Each type defines what kind of data the resource serves and which URI variables are available.
- Fill in the required fields:
- Display Text: A friendly name for the resource shown in the admin list
- Path: The path portion of the URI. For templated resources, include variable placeholders from the supported variables list shown in the UI (e.g.,
{fileName},{contentType}) - Name: The MCP resource name (used by clients to identify the resource)
- Title: Optional human-readable title
- Description: Optional description that helps clients understand the resource
- MIME Type: The content type of the resource (e.g.,
application/json,text/plain)
- Save the resource
The system automatically constructs the full URI by prepending the scheme and a unique resource ID to your path. For example, if you select the File resource type and enter {fileName} as the path, the full URI might be file://abc123/{fileName}.
Built-in Resource Types
| Type | Supported Variables | Description |
|---|---|---|
File (file) | {providerName}, {fileName} | File access via named file providers |
Media (media) | {path} | Orchard Core media library files |
Content Item (content-item) | {contentItemId}, {contentItemVersionId} | Fetch a specific content item by ID or version |
Content Type (content-type) | {contentType} | List all published content items of a type |
Recipe Schema (recipe-schema) | (none) | Full JSON schema for all recipe steps |
Recipe Step Schema (recipe-step-schema) | {stepName} | JSON schema for a specific recipe step |
Recipe (recipe) | {recipeName} | Recipe content by name |
FTP/FTPS (ftp) | {path} | Remote files via FTP (separate module) |
SFTP (sftp) | {path} | Remote files via SSH (separate module) |
How URI Patterns Work
Each resource instance has a URI that is auto-constructed by the system as:
{source}://{itemId}/{path}
{source}: the resource type name (e.g.,file,content-item,recipe){itemId}: the auto-generated resource instance identifier{path}: the user-defined path portion with optional variable placeholders
When creating a resource in the admin UI, you only provide the path portion. The system automatically prepends the scheme and resource ID.
Registering Custom Resource Types
You can register custom resource types with their handlers:
services.AddMcpResourceType<DatabaseResourceTypeHandler>("database", entry =>
{
    entry.DisplayName = S["Database"];
    entry.Description = S["Query data from databases."];
    entry.SupportedVariables =
    [
        new McpResourceVariable("table") { Description = S["The database table name."] },
        new McpResourceVariable("id") { Description = S["The row ID to fetch."] },
    ];
});
Implement the handler by extending McpResourceTypeHandlerBase:
public class DatabaseResourceTypeHandler : McpResourceTypeHandlerBase
{
    public DatabaseResourceTypeHandler() : base("database") { }

    protected override Task<ReadResourceResult> GetResultAsync(
        McpResource resource,
        IReadOnlyDictionary<string, string> variables,
        CancellationToken cancellationToken)
    {
        variables.TryGetValue("table", out var table);
        variables.TryGetValue("id", out var id);
        // Query database and return results
    }
}
Recipe Support
Resources can be exported and imported via recipes:
{
  "steps": [
    {
      "name": "McpResource",
      "Resources": [
        {
          "Source": "file",
          "DisplayText": "Configuration File",
          "Resource": {
            "Uri": "file://configs/{providerName}/{fileName}",
            "Name": "config-file",
            "Description": "Application configuration",
            "MimeType": "application/json"
          }
        }
      ]
    }
  ]
}
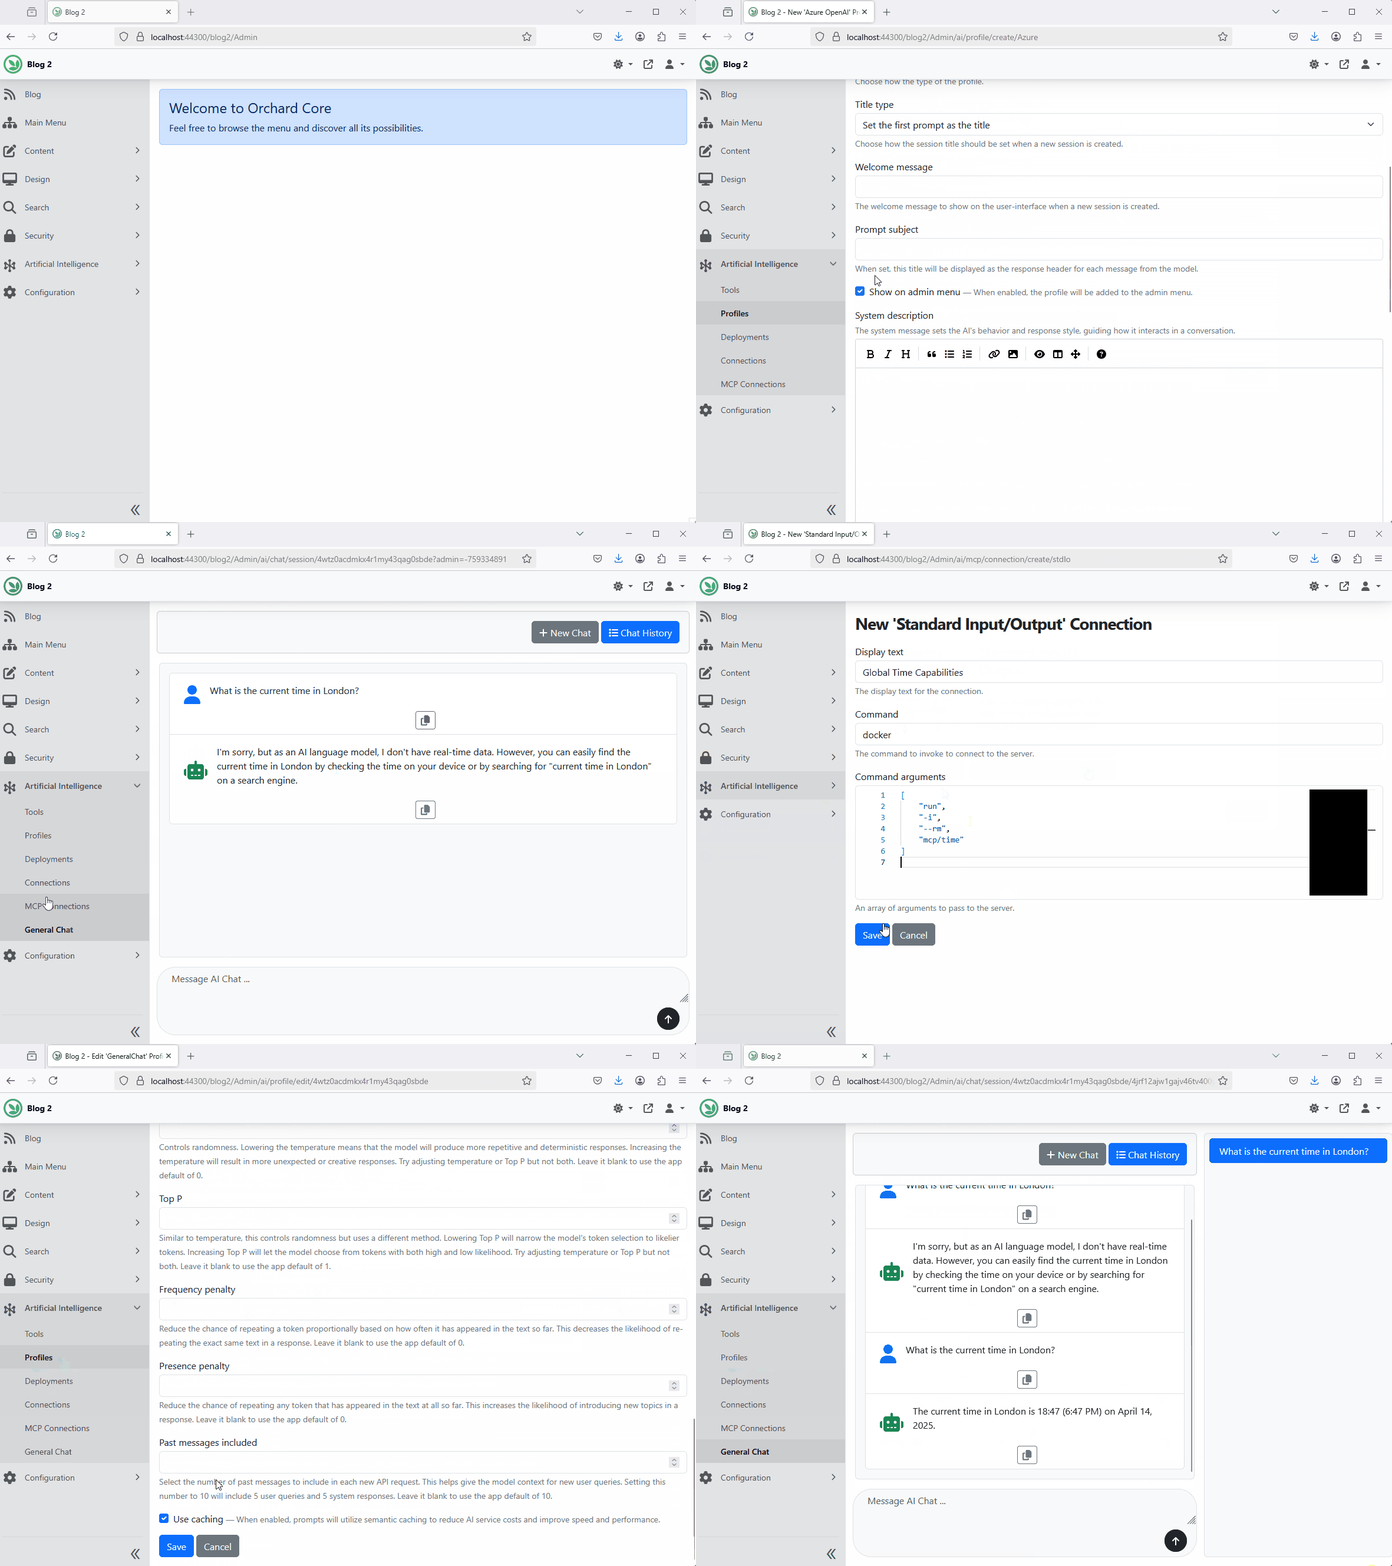
Admin Chat UI with MCP Server Integration
Security considerations
- Use
OpenIdin production environments. - Treat API keys as secrets and rotate them periodically.
- Do not use
Noneoutside local development. - Keep
RequireAccessPermissionenabled inOpenIdmode when you want an extra authorization layer. - Tool execution still respects Orchard Core permissions and tenant boundaries.
Troubleshooting
Connection refused
- Verify the MCP Server feature is enabled.
- Verify the configured authentication mode matches the client request.
- In
OpenIdmode, make sure API authentication is configured. - In
ApiKeymode, verify the configured API key matches the request.
Tools, prompts, or resources do not appear
- Verify the required Orchard Core and CrestApps features are enabled.
- Check that the expected AI tools, prompts, or resources are registered.
- Confirm the tool or tool instance is opted in on the MCP Server card under Settings → Artificial Intelligence (or that Expose all tools is enabled). Tools are not exposed until you select them.
- Confirm the calling identity is authorized for the tool, because exposed tools still respect Orchard Core permissions.
Configuration does not apply
- Verify the
OrchardCore:CrestApps:AI:McpServerpath inappsettings.json. - Restart the application after changing configuration.
- Confirm the JSON syntax is valid.